When we set out to make “Star Wars: Macbeth,” we knew that we would be giving ourselves a challenge. By setting the adventure in the Star Wars universe, it became apparent that much more was needed than just actors and a storyline. Furthermore, to hide the fact that we were NOT actors and had a rather loose storyline, we knew that special effects would carry the story.
Note: We can get away with this. That’s because we’re in high school. When you’re making a $100 million movie, you need effects, acting, AND a story. Keep this in mind. :-)
Anyway, we’ve attempted to chronicle the different techniques used to create the world of Star Wars: Macbeth. Hopefully you’ll gain a greater insight into how we made these things work and how special effects work in general. Hope you enjoy it!
Blue Screen
One of our first scenes contains Macbeth and the Imperial Officer discussing matters inside the castle—or the Death Star, depending on how you look at it. We used a technique similar to your local weather program. We put Bienvenido C. and Carl Erik F., fully costumed, in front of a “blue screen,” essentially a blue carpet hung from end to end of Bienvenido C.’s bedroom wall. We filmed this with our video camera and put it in the computer.
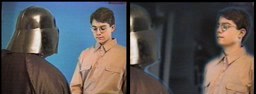
With the MediaStudio software we selected the color blue and told the computer to remove it, making everything blue transparent. It was important to make sure neither actor wore blue, or they’d be invisible! We grabbed a couple of frames from the Death Star scene in Return of the Jedi, inserted our characters, and BOOM—we were in the Death Star.
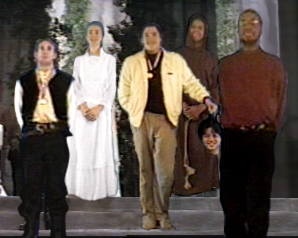
This technique was used most significantly during the final scene, when we attempted to create a conclusion to Macbeth by integrating our characters into the throne-room scene from A New Hope. We were watching the movie, trying to come up with ideas, when we began to think about how crazy and wild it would be if we just REPLACED THE WHOLE SCENE. So we did it. It was quite difficult, but it worked rather well despite a few slight glitches, such as Princess Leia’s hair.
Blue screen is a very popular technique in motion pictures. Its biggest drawback is that it’s very obvious when used. Take Air Force One, for example—we all know Harrison Ford wasn’t really hanging off that plane. Still, it’s relatively simple and cheap, which is why it remains popular.
Worst big-budget blue-screen shot on record: the Nazis and the blimp in Indiana Jones and the Last Crusade. What’s with Harrison Ford and blue screen?
Rotoscoping and Animation
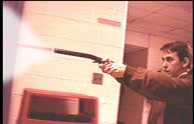
Another popular movie technique, although a bit more complex, involved directly manipulating each and every frame to create the illusion of something that was not really there. In a way, this technique is very similar to animation. The lasers in Star Wars: Macbeth were animated—essentially little red lines that moved toward or away from the screen depending on the camera angle.
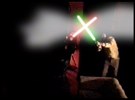
The lightsaber battles largely used this technique to create the illusion that the lightsabers were glowing. Our method was similar to the original technique used in A New Hope, where they basically painted or scratched on the individual film negative. During our battles we used white plastic sticks. We painted over these with red or green lines and a couple of different layers to achieve transparency and a three-dimensional feel. It took a lot of time, but the effect worked really well and made the fight scenes look flashy—which was probably why they came up with the whole saber idea in the first place.
The new Star Wars prequels will probably contain a lot of rotoscoping work. When blue screen is too limiting and there is too much movement for a matte shot, the folks at ILM will have to adjust every frame to achieve the desired effect. Through computers, we’ve come up with a way to achieve photo-realistic animation. Now it is truly possible to create realistic, never-before-seen worlds—and that’s what we’re going to see next May.
Image Mattes
Matte shots remove a static portion of the image and replace it with something new. Consider the Emperor’s entrance in Return of the Jedi. They never built that entire set. What we saw were about twenty people in the middle of the frame moving around. The rest of the image was STATIC. Not moving. It was a painting! Matte artists’ work is highly respected—imagine creating a painting that looks so real people mistake it for a setting. The technique added vistas to all three Star Wars movies and expanded the scope of the universe in ways that definitely paid off for the moviegoer.
In Star Wars: Macbeth, matte shots created the illusion that the high school was the Death Star. When Robert F., Raymond P., and Michael M. run down the stairs, the high-school windows were removed and replaced with the emptiness of space. This was relatively simple: tell the computer to place an image in front of a section of the frame for a period of time. The catch was that we couldn’t move the camera—or else we’d have to move the matte.
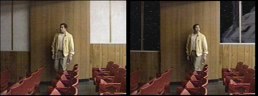
Our favorite matte shot takes place during my soliloquy, “Luke Skywalker’s Lament.” As I walk through the room, the windows behind me show a scene from The Empire Strikes Back. I continue my whining as if nothing has happened. :-)
Traditional Effects
For all the high-tech wizardry involved in producing a movie, sometimes Ockham’s Razor proves correct. Come on, didn’t you ever see Contact? The simplest explanation is often the best one. During Young Siward’s fight with Darth Vader, patterned after the Obi-Wan fight in A New Hope, we had to make Young Siward disappear when Macbeth swung the saber at him. We used a fishing rod and fishing line to hold up the robe, then let the line out when the saber passed through. It looked pretty good on video, much like the original.
Fishing line was also used as “The Force.” It made Luke’s saber fly toward him during the final battle. Strangely enough, more people asked about that simple effect than about how we made the lightsabers. Go figure.
Lighting
All good movies MUST have good lighting. It’s essential to the atmosphere of the picture. For our low-budget production, Imperial Officer Carl Erik F. doubled as lighting technician and dutifully flicked the lights on and off as we ran down the hallways. We did this to make the scene look more exciting—kind of like the Death Star was exploding.
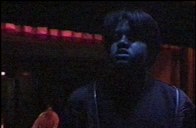
We shot the final battle on the high-school stage next to the cafeteria. Here we could afford an expansive dark background and colored lights that gave a neat feel to the tension and dread as Macbeth and Macduff met face to face. We also employed a full-strength industrial fan to spruce up the epic quality. Between the wind and the heat, we felt like we were in the middle of a storm up there. :-)
The Millennium Falcon Escape
The great Act III climax involved our heroes escaping from the exploding Death Star in the Millennium Falcon. This scene required just about every effect under the sun. First, our heroes had to run toward the Falcon as Carl Erik F. attempted to shoot them. We used a toy Millennium Falcon—a collectible now, I think!—and superimposed it with blue screen over the three of us running in the gym.

After we made it inside the Falcon, we used blue screen to superimpose Han Siward, Macduff, and Malcolm in place of Han, Luke, and Leia inside the spacecraft. To get the effect of flying around the gym, we replaced the viewing window with a “fly-by” of the high-school gym—we moved the camera around as if it were an airplane. Finally, when we reached hyperspace, we took Robert F.’s image and rotated it in the computer to simulate hyperspace travel without a seatbelt. :-)
Conclusion
In essence, the special effects used to create Macbeth are not very difficult in theory. The trick came in knowing when to use each technique and how to create an illusion that looked clean and professional. In this case, we weren’t aiming for realism, of course—we’ll save that for ILM. And what a job they’ll do. We can’t wait to see the treats in store for us in May of 1999.